

Understanding the interface
If audio post for film and TV is your primary focus, then Fairlight is up to the task. Resolve will import XML, FCPXML, and AAF files for both color and sound finishing. Fairlight includes an ADR recording routine, a free sound effects library, and a foley sampler plug-in.
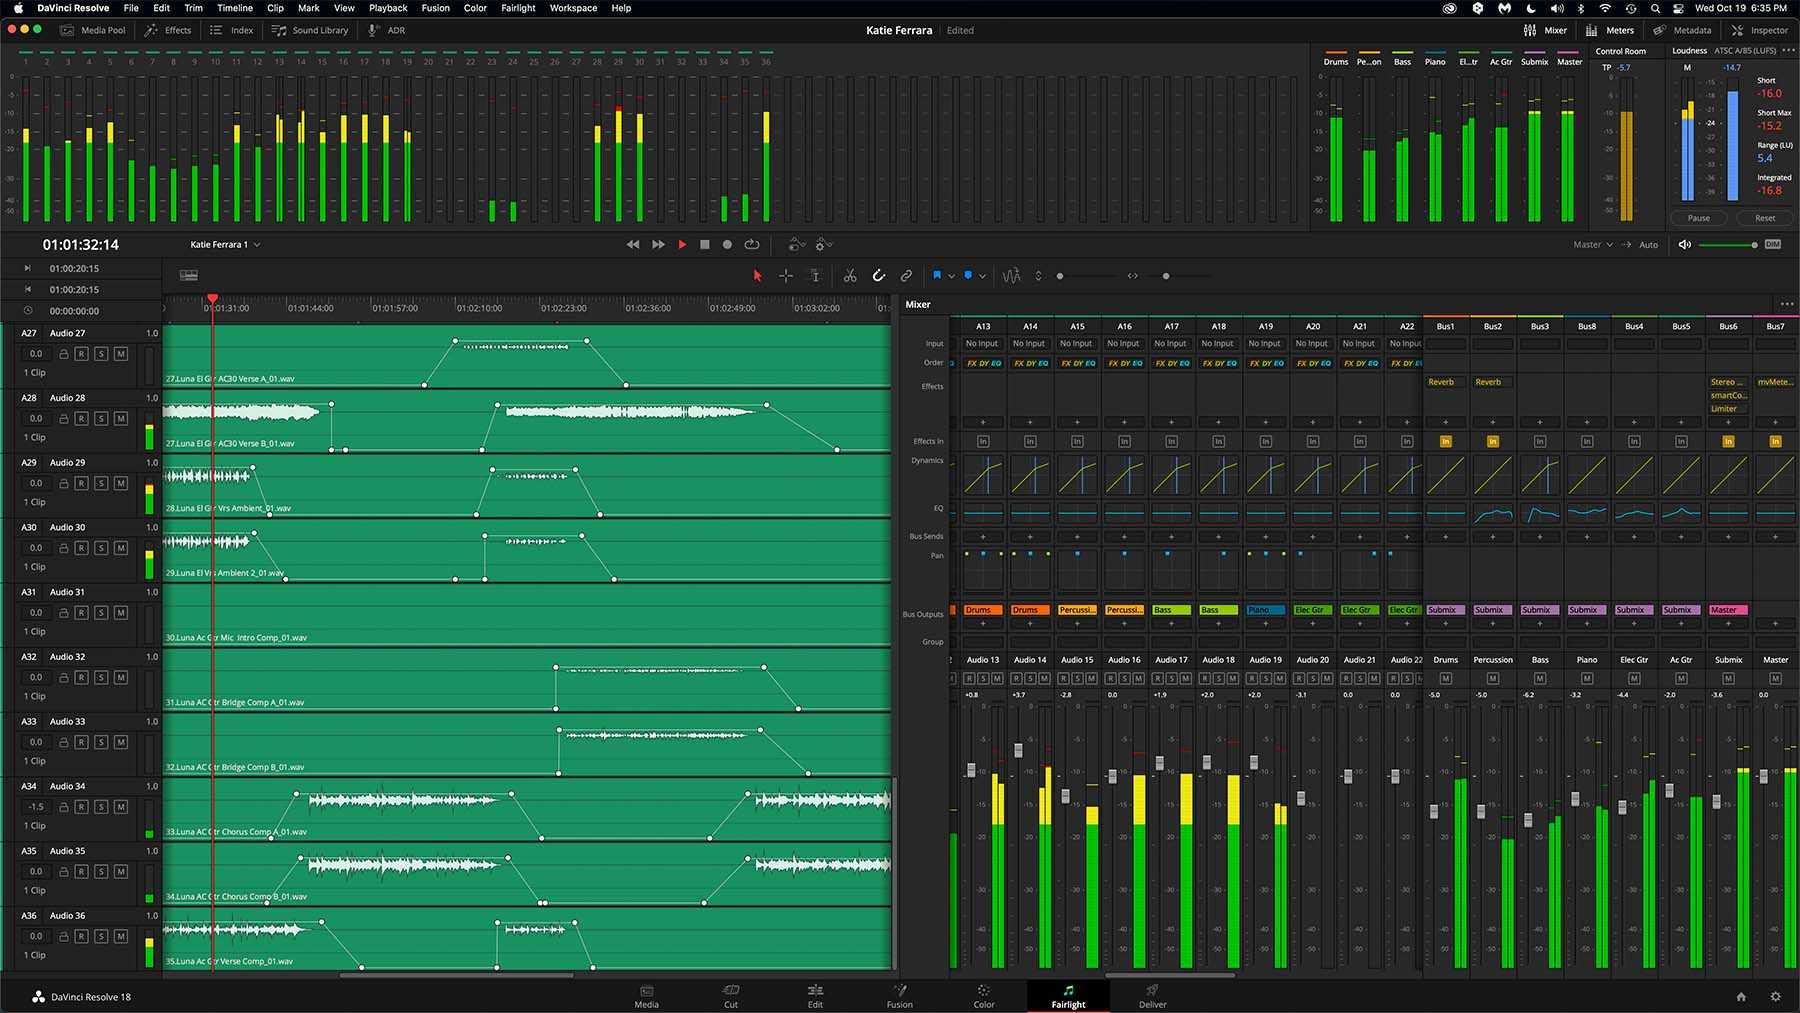
The Fairlight interface is compatible with single and dual-display configurations and uses UI panels that can be turned on and off or slid onto the screen as needed. You can show or hide individual pieces of the mixer, as well. Unfortunately, on a single-display system, like an iMac, you cannot display the mixer panel full-screen. A project with 20 to 30 or more source tracks requires left to right scrolling. However, after the 18.1 update you can now display the meter bridge with two rows of meters.
The mixer uses a channel strip format for each track, which includes input/output/send routing, effects, and a built-in parametric equalizer and compressor. This is much like the channel strip of a traditional analog studio console, such as classic SSL and Neve desks. Unlike some other DAWs, you can also change the signal order of effects, EQ, and dynamics (compression) within each channel strip.
Установка и настройка
Для установки и настройки Fairlight audio accelerator utility следуйте инструкциям ниже:
- Загрузите установочный файл Fairlight audio accelerator utility с официального сайта разработчика.
- Запустите установочный файл и следуйте инструкциям мастера установки.
- После завершения установки, запустите программу Fairlight audio accelerator utility.
- В меню программы выберите пункт «Настройки» или «Settings».
- В настройках программы укажите необходимые параметры для работы с аудио.
- Настройте параметры звука, такие как громкость, битрейт, частота дискретизации и другие, в соответствии с вашими предпочтениями.
- Сохраните настройки и закройте программу.
После завершения установки и настройки Fairlight audio accelerator utility вы будете готовы использовать программу для обработки и улучшения звука на вашем компьютере.
Modern plug-ins
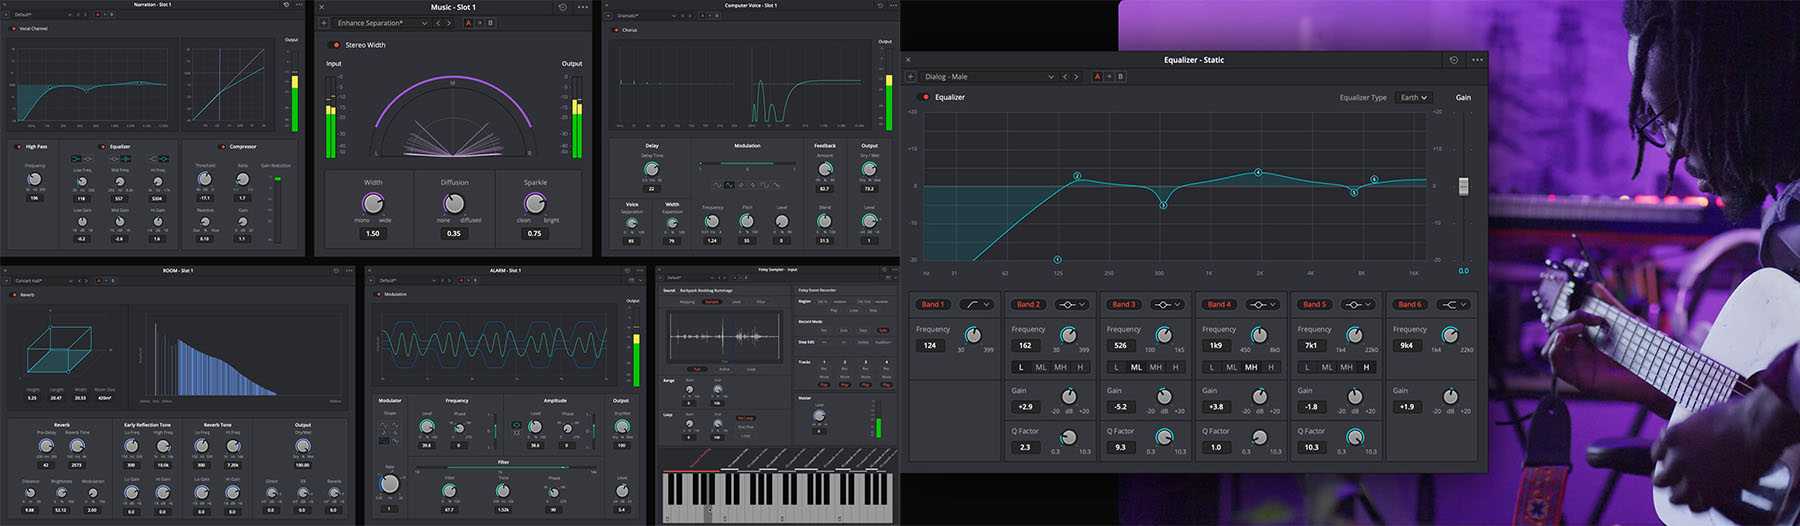
Resolve comes with native Fairlight FX audio plug-ins that cover most common needs. But since this software is targeted towards the film and TV post customer, it doesn’t include music-centric plug-ins, like the guitar amp and pedal emulations offered in Apple’s Logic Pro. That focus is true of the plug-in presets, as well. For example, the factory preset choices in the compressor will be for dialogue and not musical instruments, such as a drum kit or guitar. That won’t keep you from working on music with these plug-ins. Presets are just suggestions anyway, so you should tweak based on what sounds right to you.
Fairlight does not color the sound. The sonic character, interface, and plug-in design takes a clean, modern approach. There are no “vintage” options and none of the plug-ins are designed as skeuomorphic emulations of studio gear synonymous with classic recordings from the 70s. After all, film re-recording mixers have never been particularly precious about certain consoles or outboard gear from ages ago. Other than maybe a love for old Nagras, I doubt there’s much fondness for old audio gear like mag dubbers. At least not in the same way that music recording engineers still like to use analog recorders in their signal chain.
If you do want vintage tools, then Fairlight supports third-party AU and VST plug-ins. However, as with other video applications, I’ve found that some of the skeuomorphic effects don’t always work or look right. For example, I often use the free VU meter from TBProAudio. In Fairlight, only the AU version will appear as intended. And if you own an M1 or M2 Mac, then double-check that your favorite third-party plug-in is natively supported.
Основные функции и возможности
1. Ускорение звуковых процессов
Основной функцией Fairlight audio accelerator utility является ускорение звуковых процессов. Это достигается за счет интеллектуальной оптимизации обработки аудио данных и эффективного использования аппаратных ресурсов. Ускорение звуковых процессов позволяет сократить время обработки аудио и повысить производительность в работе с звуком.
2. Обработка и редактирование звука
С помощью Fairlight audio accelerator utility можно производить множество операций по обработке и редактированию звука. Возможности включают в себя:
- нарезку и склеивание звуковых файлов;
- изменение громкости и баланса;
- добавление эффектов и фильтров;
- обработку звука в реальном времени;
- создание и редактирование звуковых эффектов и аудиодорожек.
3. Работа с множеством форматов аудио
Fairlight audio accelerator utility поддерживает широкий спектр форматов аудио файлов, что позволяет работать с различными источниками и типами звуков. Вы сможете импортировать и экспортировать файлы в популярных форматах, таких как MP3, WAV, FLAC, AIFF и других. Богатый выбор форматов позволяет вам работать с аудио файлами, созданными различными устройствами и программами.
4. Поддержка многоканального звука
Еще одной функцией Fairlight audio accelerator utility является поддержка многоканального звука. Это означает, что вы сможете работать с аудио файлами, содержащими несколько каналов звука, таких как стерео, 5.1 surround sound и других. Вы сможете редактировать, обрабатывать и экспортировать многоканальные звуковые файлы, открывая перед вами больше возможностей для работы с аудио.
5. Интеграция с другими программами и оборудованием
Fairlight audio accelerator utility позволяет интегрироваться с другими программами и оборудованием, что делает ее универсальным инструментом для работы с звуком. Благодаря интеграции вы сможете перемещаться между различными приложениями и использовать разнообразное оборудование для максимального комфорта и продуктивности работы с звуком.

В целом, Fairlight audio accelerator utility предоставляет широкий набор функций и возможностей для работы с звуком, позволяя сократить время обработки аудио, повысить производительность и получить качественный звуковой результат. Это незаменимый инструмент для профессионалов звукозаписи и озвучивания, а также для всех, кто работает с аудио файлами и хочет достичь наилучших результатов в обработке звука.
Fairytale is a smart solution for quickly archiving and managing your entire 8″ Fairlight Library on a compact SD card.
Why SD Cards?
Working with the SD card is simple, fast, quiet, comfortable and free of wear and tear. You can copy your 8″ floppy disks to SD card, archive to an PC and download samples from the Internet. At the push of a button you have access to literally thousands of samples. For the Fairlight, it makes no difference whether she loads data from the real or a virtual floppy.
Just another HxC solution or what makes Fairytale so special?
Fairytale is not just another HxC solution on the market. It is rather a combination of a modified HxC controller and the new intelligent Fairytale interface:The Controller emulates two 8″ drives using removable SD cards as storage. With the buttons and the large display it is easy to select the desired file. The two additional toggle switches define whether the Fairlight accesses the 8″ floppy or the SD card.The Fairytale Interface provides the computer driven logic for floppy disk communication, drive address selection, and controller power.
The Benefits of the Fairytale System:
The Controller stands handy in reach: The long connection cable allows ergonomic positioning next to the Alpha keyboard.
Just one cable: There is just one connection cable to the Controller which contains all signals for floppy communication, drive select and also power supply. No additional USB connections, power cords etc. are needed.
Both 8″ Drives are retained: You can still work with your proven 8″ floppy drives if required. This is especially important when you are in a creative musical process and you want quickly save your work. Just insert an empty disk and store everything — no need to search for an empty SD file, you can do that later.
Four Floppy Drives: Fairytale uses a hidden feature of the Fairlight to address four drives (Disk 0 — 3). Therefore you can use both 8″ drives with the two virtual SD-drives simultaneously.
Floppy-Select is at the Controller: The toggle switches are handy to reach. Using them specifies the access to the 8″ floppy or SD card, each for Disk 0 and 1. By the way, e.g. if Disk 0 is active as «SD-A», then the left 8″ floppy becomes automatically Disk 2.
Easily duplicating System and Sample Disks: The included Virtual Music Utilities Disk 2 offers new applications for quick cloning of system or sound disks in all variations (8“ to 8“, 8“ to SD, SD to 8“).
Automatic Update in Page 2 Directory or File Transfer: When changing a floppy select switch, «Page 2» automatically updates the directory of the new selected disk or starts the file transfer. This is done by the intelligent communication of the Fairytale interface as the CMI recognises the floppy disk change.
Easy Installation
The installation is Plug & Play. All components are plugged in, the cable to the controller is led out at the back of the CMI and is pluggable. The Fairlight remains unchanged in its optical state.
Scope of Delivery
- Instructions for installation and operation
- Fairytale SD-Controler
- SD card with system software, sounds and applications
- Fairytale computer interface
- All cables and plugs
Polishing the mix with Fairlight
My goal was to come out with a result that hit desired loudness targets and sounded good to me, primarily sticking with the stock plug-ins. You’re going to adjust levels, but most of the effects center around EQ, compression, and reverb. Each of these is adequately covered by the complement of Fairlight FX. If you have singers, then there are also vocal processing effects, like de-essing. However, an investment in iZotope RX is certainly a useful add-on. For example, RX includes a specific tool to remove or reduce guitar squeaks and string noise. The Resolve 18.1 update added many audio-centric features, including a new voice isolation feature. It works well for any vocal situation and in my opinion has fewer negative artifacts than most of the competing options.
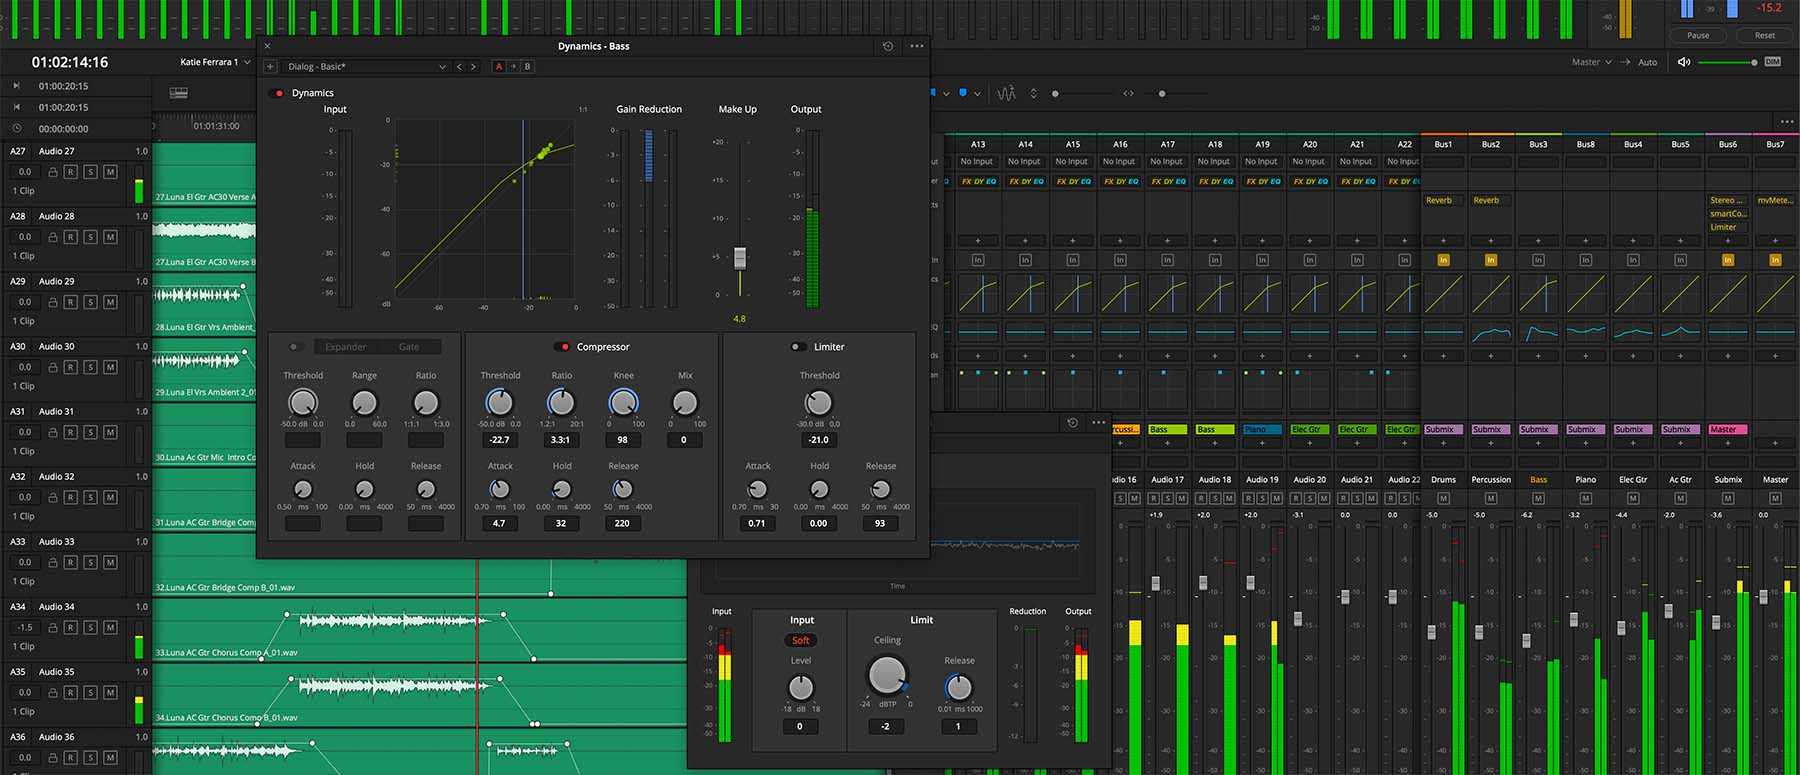
I adjusted level, panning, EQ, and compression on each channel strip. At the buss level, I added more EQ and compression, plus some reverb. The last stage was a multiband compressor and a brick wall limiter on the submix buss. Only meter plug-ins were added to the master buss. Of course, Fairlight includes its own useful set of level and loudness meters.
Since Fairlight is built into an NLE, the project supports multiple mixes. You can use bins and timelines to organize the tracks and mixes for different songs, as well as different versions of each mix. Resolve 18 added new cloud collaboration tools; however, you can also collaborate on mixes by exporting a timeline file to send to a colleague. Assuming the other system has access to the same audio files and third-party plug-ins (if used), then it’s simply a matter of importing that timeline file.
Processing for this number of tracks and effects was easily handled by my iMac. It could have handled more, including more intense third-party plug-ins, like Gullfoss, Ozone, FabFilter, or Sonible. If you really need to go BIG, then Blackmagic Design promises up to 2,000 real-time tracks with a full Fairlight hardware installation! So if Pro Tools isn’t in the cards for you, then make sure you give Fairlight and Resolve a closer look.
Fairlight CMI IIX Sample-Libraries in SD-Card Format
After completing the Fairytale project, I started systematically converting our 8″ floppy disks into SD format. To maintain and preserve these sounds, I would like to share these treasures with the Fairlight community. This is just the beginning, so you’ll find new libraries here on a regular basis.
How to use these files?
Download and unzip the particular file to your PC. Copy the folder to SD Card. Your CMI IIX can load the samples via «Page 2» in the usual way with the MuStudio Flash Kit or with our Fairytale system.
Optimally, you boot the Fairlight from the system diskette which is contained in the folder. It manages the respective samples under «Page L», which gives you a quick overview of the entire library.
CMI IIX Sample Libraries:
- Best of Fairlight USA (8 Disks + System)
- CML Library (11 Disks + System)
- Kristian Schultzes Library (9 Disks + System)
- Original CMI IIX Library V1.4 (46 Disks + System)
- Erdenklang Library by Zuschrader/Bognermayr (150 Disks) Please send an E-Mail for download link and specify your target machine (CMI I, IIX; etc)
- Sven Miracolo Library (8 Disks + System) Thank you, Sven!
- Bill Hanger Library (25 Disks + System — ex Fairlight employee) NEW
Setting up your tracks
I’m a video editor, not a mixer. But as a hobbyist, I like to experiment with music mixing to hone my audio skills. To test Fairlight, I started with multitracks of song covers available from Warren Huart’s “Produce Like A Pro” YouTube channel. I didn’t record my own tracks, other than to test how recording might work. I’m a big believer that a great mix is achieved by doing 90% of the work at the time of the studio recording. It’s not about building the sound through plug-ins and tricks, but getting the right blend of gear, mics, and performance from the players. That was already there in these multitracks, so the mix was more about finding the right balance of these elements and enhancing what was there.

Fairlight works with as many tracks and busses as are created in your timeline. My standard layout for mixing is to use summing busses. You can create as many as you need. The 35 tracks for this song include drums, percussion, bass, piano, electric and acoustic guitars. I route each set of instrument tracks to a buss dedicated to that group, even if there’s only one instrument track in that group.
These six busses are then routed to a submix buss, which in turn is routed to the master stereo output buss. This allows for gain staging and quickly balancinglevels. You can apply effects onto any track or buss for total flexibility. Fairlight’s default setting automatically routes the first buss (drums in my case) as the output to the speakers and on the Deliver page. Be sure to change each of these to your master buss for the proper output when you deviate from Fairlight’s default assignments.
Преимущества и применение
Fairlight audio accelerator utility предлагает несколько преимуществ, которые делают ее незаменимым инструментом для работы с аудио.
- Ускорение процесса обработки аудио: Благодаря использованию специального оборудования и оптимизированных алгоритмов, Fairlight audio accelerator utility значительно повышает скорость обработки аудио сигналов. Это позволяет существенно сократить время работы и увеличить производительность.
- Высокое качество звука: Fairlight audio accelerator utility обеспечивает высокое качество обработки звука благодаря использованию передовых алгоритмов и многолетнему опыту в области аудио технологий. Это позволяет получить чистый, четкий и богатый звук без искажений и шумов.
- Широкий спектр функций: Fairlight audio accelerator utility предлагает множество полезных функций для работы с аудио, включая редактирование, обработку эффектов, сведение, мастеринг и многое другое. Благодаря этому инструменту можно легко реализовать самые сложные задачи в области аудио продакшн.
- Интуитивно понятный интерфейс: Fairlight audio accelerator utility имеет профессиональный и удобный в использовании интерфейс, который позволяет быстро освоить инструмент и эффективно работать с ним. Это упрощает процесс обработки аудио и снижает вероятность ошибок.
Применение Fairlight audio accelerator utility включает в себя широкий спектр областей, где аудио обрабатывается для разных целей.
- Музыкальное производство: Fairlight audio accelerator utility может быть использована в студии для обработки, сведения и мастеринга музыкальных композиций. Он предоставляет все необходимые инструменты для достижения высокого качества звука.
- Видео пост-производство: Fairlight audio accelerator utility позволяет производить дорожку звука для видео, включая добавление звуковых эффектов, сведение звука и редактирование голоса.
- Радиовещание и телевидение: Fairlight audio accelerator utility может быть использована для обработки и сведения звука в радио- и телевизионных программ.
- Аудио анимация и игры: Fairlight audio accelerator utility помогает создавать звуковые эффекты для аудио анимации и компьютерных игр, что обеспечивает более реалистичное и захватывающее впечатление от игры или фильма.
Таким образом, Fairlight audio accelerator utility является важным инструментом для обработки аудио, который предлагает ускорение процесса, высокое качество звука, широкий спектр функций и удобный интерфейс
Его применение находит в различных областях, где важно достичь высокого качества звука
Hassle Free Returns
At Motion Media, our goal is to ensure your complete satisfaction with your purchase. If, for whatever reason, you are dissatisfied with your purchase, you may return it to Motion Media within 30 days. Claims for missing items or items damaged in transit must be received within three business days of receipt of merchandise.
Refunds on returned items will be issued in the same payment form as tendered at the time of purchase. If payment was made by credit card, once we receive the product we will credit your account. Please allow 7-10 days for a credit to appear on your credit card statement. If payment was made by check, please allow 10 business days for a refund check to be issued.
Please read all conditions below. If conditions are not met, Motion Media reserves the right to refuse the return or to charge a restocking fee of up to 25%.
How to return or exchange an item:
- In order to return an item you need to first obtain an RMA (Return Merchandise Authorization) number.
- To request an RMA number, please visit our contact page and send us an email with the request.
- To request an RMA number by phone, call Customer Service at 310-450-4000.
- Place the original package into a shipping carton.
- Include the invoice and the reason for the return. If defective, please specify the defect.
- Please do not place stickers or shipping labels on the original manufacturer’s package.
- The RMA number must be clearly written on the outer box. If you received a label in the email, print the label and tape it to the carton.
- Ship via insured ground service with a tracking number. Return shipping charges are the responsibility of the customer. We are not responsible for lost or damaged packages.
- Send pre-authorized returns to: Motion Media, LLCAttn: RMA#XXXXX 709 N. Douglas St. El Segundo, CA 90245
- Alternatively, you may return an item at our office at the above location, with an approved RMA.
Rules:
- All returned or exchanged items must be in new condition, in the original box, and must include all packing material, blank warranty cards, manuals, and all accessories.
- Motion Media is not responsible for personal data or items left in returned merchandise.
- Defective items may be repaired or exchanged at our discretion for the same model or manufacturer’s equivalent model.
- RMA numbers are valid for 10 days.
- Motion Media is not responsible for any consequential or incidental damage resulting from the sale or use of any merchandise bought from us. We are responsible for the monetary value of the merchandise only.
No Return/Exchange On:
- Any Electronically Delivered Software*
- 3D Printers & Accessories
- Custom systems built or modified by Motion Media to customer’s specifications
- Educational dvd’s and books once unwrapped
- Motion Media Gift Cards are redeemable for merchandise only and may not be redeemed for cash.
*We offer 30 day returns on Autodesk licenses, excluding monthly terms.
Smart Floppy and SD-Management System for the Fairlight CMI
Are Fairytale and Flash Kit combinable?
The start of the Fairytale system has generated the question if our Fairytale System and MuStudio´s Flash Kit are combinable. The short answer is: Yes! With just little modifications all the advantages of Fairytale can be used with an already installed Flash Kit.
Prerequisites for the Fairytale Upgrade
- The CMI is equipped with the slim disk drives
- The Flash Kit is from the revision 2; with two toggle switches beside the LCD
- Both original 8” drives and the original 50pin floppy cable are on hand
- Little soldering is required to connect the switches with the interface (4 wires will be soldered on)
What are the benefits of upgrading the Flash Kit?
Two 8″ Drives: You can work with both 8″ floppy disks again. Great for making copies of 8” floppies or converting and building your own libraries. Also in the musical process it´s geat to switch from SD card to real 8″ for instant access. All done with a sinlge operation of one switch.
Four Floppy Drives: Fairytale uses a hidden feature of the Fairlight to address four drives (Disk 0 — 3). Therefore you can use both 8″ drives with the two virtual drives simultaneously.Logic operation of the toggle switches: The built-in toggle switches are changed in their function which now allows a logical and consistent work. The swiches specify the access to the 8″ floppy or SD card for each Disk 0 and 1. For instance if Disk 0 is active as «SD-A», then the left 8 «floppy is automatically Disk 2.Easily duplicate System and Sample Disks: The included Virtual Music Utilities 2 offers new applications for quick cloning of system or sound disks (8“ to 8“, 8“ to SD, SD to 8“).Automatic Update in Page 2 Directory or File Transfer: When changing a floppy select switch, the Fairytale interface communicates with the CMI, which recognises this measure as a floppy disk change. The directory is updated or the file transfer starts.
Installation
The installation of the Fairytale Upgrade is quite easy. Some parts of the Flash Kit will be extracted (adapter cable, power supply), some reinstalled (original floppy cable, second floppy drive), four wires need to be soldered on and a sticker needs to be attached. Finally the Fairytale interface will be plugged in.
Operation
The work with the upgraded Flash Kit is as easy as with the Fairytale System. Just that the Controller is installed in the CMI.
Scope of Delivery
- Instructions for installation and operation
- Fairytale computer interface
- Cable for data and power supply
- Sticker with new toggle switch functions
- Virtual Music´s Utility Disk V2.0 as Download Option
Order and availability
Code: Fairytale Upgrade for CMI I, II or IIX (please specify your CMI model)Price: 295,- Euro net / 354,- Euro gross
Current Status: Fairytale Upgrade is available in small quantities.
After the announcement of the Fairytale system, several people asked how to work with four floppy drives and what advantages it brings.
The Shugart bus used by Fairlight supports four floppy drives. By default, the CMI works with two drives, which is sufficient for normal operation. However, with only two drives the swift copying of floppy disks becomes time-consuming: Samples can be copied only under «Page 2» with the «Transfer» command. Furthermore, when copying system floppies, Q-DOS always crashes at the end and the CMI has to be rebooted.

With additional drives, the duplication of sound and system disks is extremely swift. Even disks with samples can be copied with QDOS and there is no crash after finishing the backup process. By the way in our daily routine the extended bus makes it efficient to repair defective 8″ drives as they are added as a third drive to the testing system.
The CMI with four 8″ drives – Hardware
For upgrading to four drives, the CMI requires the following components:
- A 50-pin floppy cable with a total of 4 floppy connectors (1: 1)
- Additional 8″ drives (e.g., Mitsubishi 2896-63, QumeTrak 242,..)
- The jumpers of the drives are set according to the CMI service manual
- The IDs of the two new drives must be set to ID 3 and ID 4
- Without metal covers the CMI has room for four drives
- An external power supply with 24 volts and 5 volts — as supply for the new drives
The CMI with four 8″ drives — Software
The CMI starts the drive addressing with Disk 0. So, the left system drive is Disk 0 and the right side drive is disk 1. Under Q-DOS, the drives are addressed in exactly the same way, for example with DIR: 1 for the directory of the right-hand drive.
With additional drives the address range is expanded with Disk 2 and Disk 3:
- DIR :2 -> Directory of Disk 2
- BACKUP :3 :2 -> Backup from source Disk 3 to destination Disk 2
Practical application of multiple drive
The CMI boots with Q-DOS in Drive 0.
Duplicating system floppy disks:
- Put the empty destination disk in Drive 1
- Place the source disk in Drive 2
- Enter FORMAT to format the blank floppy disk in Drive 1*
- Enter BACKUP: 2: 1 to duplicate the entire system disk from Disk 2 to Disk 1
Duplicating sample floppy disks:
- Put the empty destination disk in Drive 1
- Place the source disk in Drive 2
- Enter CFG :1 O to put Drive 1 in the mode for samples
- Enter CFG :2 O to put Drive 2 in the mode for samples
- Enter FORMAT to format the blank floppy disk in Drive 1*
- Enter BACKUP :2 :1 to duplicate the entire sample disk from Disk 2 to Disk 1
- If finished enter CFG :1 and CFG :2 to put the two drives to the default mode
* Q-DOS only formats disks in drive
The concept of four drives is also realized in the Fairytale system: Two 8″ floppies and two virtual drives are available simultaneously. While Q-DOS is booted from the SD card you can quickly duplicate sample and system disks as well as converting them to the SD card. It is even easier with the new Virtual Music Utility Disk V2.0. This disk contains ready to use applications for every imaginable duplication situation.